Adventures with the Soldered Inkplate 6COLOR
In which the author exposits his time using the Inkplate 6COLOR, an E-Ink display from Soldered Electronics, to make a Christmas present for his brother.
By: TheHans255
1/12/2024
This most recent Christmas, I learned rather early that my older brother (screen name CmdrJorgs - he's on Github, check him out!) was going to be the proud new recipient of a really nice Sony DSLR camera. I had also recently come across the Inkplate, a line of E-Ink equipped microcontroller boards by Soldered Electronics. And so I thought: why don't I use one of these to make my brother a convenient little cycling E-Ink photo frame that he can display his new pictures on? Sure, they might not do them as much justice as a computer screen or printed photo would, but it would be a great way to get many pictures at once into the same, cute little viewing space, either on the wall or on a desk or table.
For this project, I chose the Inkplate 6COLOR, a 6-inch display capable of displaying 7 different colors. The processor attached to this unit, an ESP32, is quite a capable beast, programmable in both Arduino and MicroPython and supporting built in Wi-Fi and Bluetooth connectivity. The unit also comes with an SD card reader, a removable enclosure and battery, a USB-C port for charging and data, and, of course, the E-Ink screen. Even just that alone would have been a fun present for my brother, but since I wanted to give him something he would immediately appreciate out of the box, I also took some time to program a digital photo frame app for him.
An aside: Why E-Ink?
If you're not familiar with E-Ink, let me give a quick rundown: E-Ink is a type of digital display that uses electrically charged pigments, rather than lights, to produce an image. First invented in the 1990s, it became popular in the late 2000s due to the advent of the Amazon Kindle, a portable device for digitally reading books.
The power of E-Ink is immediately apparent with the Kindle: the display has much of the same look and feel of paper, including the ability to be read in direct sunlight, while still being a display that can be digitally updated. E-Ink is also a very power-efficient display - the image is retained even when the power is off, so the Kindle's battery life can be accurately measured in page turns, rather than hours or days. Both of these things also make E-Ink a great choice for a digital photo frame - the display would have the same look and feel as the true printed photos hung around it, and since it can remain off between photo changes, it can remain on the wall for months at a time before it has to be taken down to be recharged.
The main disadvantage of E-Ink, and the main reason E-Ink displays haven't really taken the world by storm, is the long refresh time. Unlike our modern LCD, LED, and OLED displays that can refresh hundreds of times per second, an E-Ink display can take at least a full second to fully update just once - and it looks kind of janky doing it. The number of levels of brightness that each E-Ink pixel can take on is also relatively low, with a heavy reliance on dithering to create the illusion of greater color/value depth. Both of these problems are, unfortunately, exacerbated on the color display the Inkplate 6COLOR uses - the display can take up to 25 seconds to fully update, with a lot of color flashing while this is going on, and the selection of only 7 colors means that dithering is essentially required to get an image to look good on the display at all.
Fortunately, though, neither of those things is a problem for a photo frame - photos are static, so they don't need to spend time updating, and the pixels of the display are small enough that dithering is quite effective. So despite the limitations, I soldiered on!
If you're interested in further reading, the Dutch Youtuber Posy has a great video on the subject of E-Ink, including an exploration of how it works and some super close-up shots of various E-Ink displays, including the one attached to the 6COLOR.
Programming the Photo Frame
Once I got the Inkplate in the mail, it was time to program it! I followed the Getting Started documentation by downloading Arduino Studio, downloading the board definitions from Soldered Electronics, adding the Inkplate libraries from the plugin browser, and copying in some of the examples in the Github repository. There were some hiccups in the process - the docs, for instance, failed to mention that the board had to actually be turned on in order for it to receive code, but I was soon able to start running some code on the board!
Within a few hours, I had adapted one of the examples to create a program that pulled random images off the SD card and displayed them to the screen. I have provided it as a Github Gist and have also provided it below:
/*
 * This project is adapted from the Inkplate6COLOR_Image_Frame_From_SD example for Soldered Inkplate 6COLOR.
 * (available at https://github.com/SolderedElectronics/Inkplate-Arduino-library/blob/master/examples/Inkplate6COLOR/Projects/Inkplate6COLOR_Image_Frame_From_SD/Inkplate6COLOR_Image_Frame_From_SD.ino).
 *
 * It is modified to display the images in a random order as opposed to a sequential order.
*/

// Next 3 lines are a precaution, you can ignore those, and the example would also work without them
#ifndef ARDUINO_INKPLATECOLOR
#error "Wrong board selection for this example, please select Soldered Inkplate 6COLOR in the boards menu."
#endif


/******************CHANGE HERE***********************/

// Set the time between changing 2 images in seconds
// Note: It will take a couple of seconds more (or longer if there is a file that must be skipped because it can't be
// drawn) than the specified time because Inkplate needs time for loading and display the image
#define SECS_BETWEEN_PICTURES 300

// Path to the folder with pictures (e.g. there is a folder called images on the SD card)
const char rootPath[] = "/images/"; // NOTE: Must end with /

/****************************************************/

#include "Inkplate.h" // Include Inkplate library to the sketch
#include "include/Image.h"
Inkplate display;     // Create an object on Inkplate library

void setup()
{
    display.begin();             // Init Inkplate library (you should call this function ONLY ONCE)
    display.clearDisplay();      // Clear frame buffer of display
    display.setCursor(0, 0);     // Set the cursor on the beginning of the screen
    display.setTextColor(BLACK); // Set text color to black

    display.rtcGetRtcData();
    {
      int randSeed = display.rtcGetEpoch();
      srand(randSeed);
    }

    if (!display.sdCardInit()) {
      display.println("SD Card Error!");
      display.display();
      deepSleep();
    }

    SdFile rootFolder;
    if (!rootFolder.open(rootPath)) {
      display.println("Failed to open images folder!");
      display.println("Please verify that a folder called images");
      display.println("exists on the inserted SD card.");
      display.display();
      deepSleep();
      return;
    }

    if (!exploreFolder(&rootFolder)) {
      display.println("No available files to display.");
      display.display();
      deepSleep();
    } else {
      // TODO: Print low battery warning if needed
      // Go to another image after waiting to display this one
      display.display();
      esp_sleep_enable_timer_wakeup(SECS_BETWEEN_PICTURES * 1000000LL);
      deepSleep();
    }
}

bool exploreFolder(SdFile *folder) {
  for (int attemptCount = 0; attemptCount < 3; attemptCount++) {
    bool result = exploreFolderInner(folder);
    if (result) return result;
  }
  return 0;
}

bool exploreFolderInner(SdFile *folder) {
  display.print("Exploring folder ");
  printlnFilename(folder);
  int fileCount = 0;
  {
    SdFile file;
    folder->rewind();
    while (file.openNext(folder, O_READ)) {
      fileCount++;
      file.close();
    }
  }
  if (fileCount <= 0) {
    display.println("Folder contains no files");
    return 0;
  }
  int fileIndex = abs(rand() % fileCount);
  display.print("Selecting index ");
  printNum(fileIndex);
  display.print(" /");
  printNum(fileCount);
  display.println();
  {
    SdFile file;
    folder->rewind();
    for (int currentIndex = 0; currentIndex <= fileIndex; currentIndex++) {
      if (!file.openNext(folder, O_READ)) {
        display.println("Error while seeking folder");
        return 0;
      }
      if (currentIndex < fileIndex) {
        file.close();
      }
    }
    display.print("Selecting file ");
    printlnFilename(&file);
    if (file.isHidden()) {
      display.println("File is hidden, skipping");
      file.close();
      return 0;
    } else if (file.isDir()) {
      return exploreFolder(&file);
    } else {
      return displayImage(&file);
    }
  }
}

bool displayImage(SdFile *file) {
  int16_t byte1 = file->read();
  int16_t byte2 = file->read();
  file->rewind();
  bool result;
  if (byte1 == 0x42 && byte2 == 0x4d) {
    // it's a bitmap
    result = display.drawBitmapFromSd(file, 0, 0, 1, 0);
  } else if (byte1 == 0xff && byte2 == 0xd8) {
    // it's a JPEG
    result = display.drawJpegFromSd(file, 0, 0, 1, 0);
  } else if (byte1 == 0x89 && byte2 == 0x50) {
    // it's a PNG
    result = display.drawPngFromSd(file, 0, 0, 1, 0);
  }
  if (!result) {
    display.print("Cannot display ");
    printlnFilename(file);
    return 0;
  }
  return 1;
}

void printNum(int value) {
  char itoaBuffer[13];
  itoa(value, itoaBuffer, 10);
  display.print(itoaBuffer);
}

void printlnFilename(SdFile *file) {
  int maxFileNameLen = 128;
  char nameBuffer[maxFileNameLen];
  file->getName(nameBuffer, maxFileNameLen);
  display.println(nameBuffer);
}

/**
 * @brief     Turn off all peripherals, go to deep sleep, and enable wakeup on the wake button.
 */
void deepSleep()
{
    // Turn off the power supply for the SD card
    display.sdCardSleep();

    // Enable wakeup from deep sleep on GPIO 36 (wake button)
    esp_sleep_enable_ext0_wakeup(GPIO_NUM_36, LOW);

    // Put ESP32 into deep sleep (low power mode)
    esp_deep_sleep_start();
}

void loop() {
  // Should never be reached
}
Adventures in Dithering
When I finally had the program ready and running on the Inkplate, I put in some test images to explore solutions. And I ran into a rather upsetting problem - the aforementioned dithering, which was necessary to get a good approximation of color depth on the 6COLOR's display, looked terrible, especially in the realm of cyan and magenta:
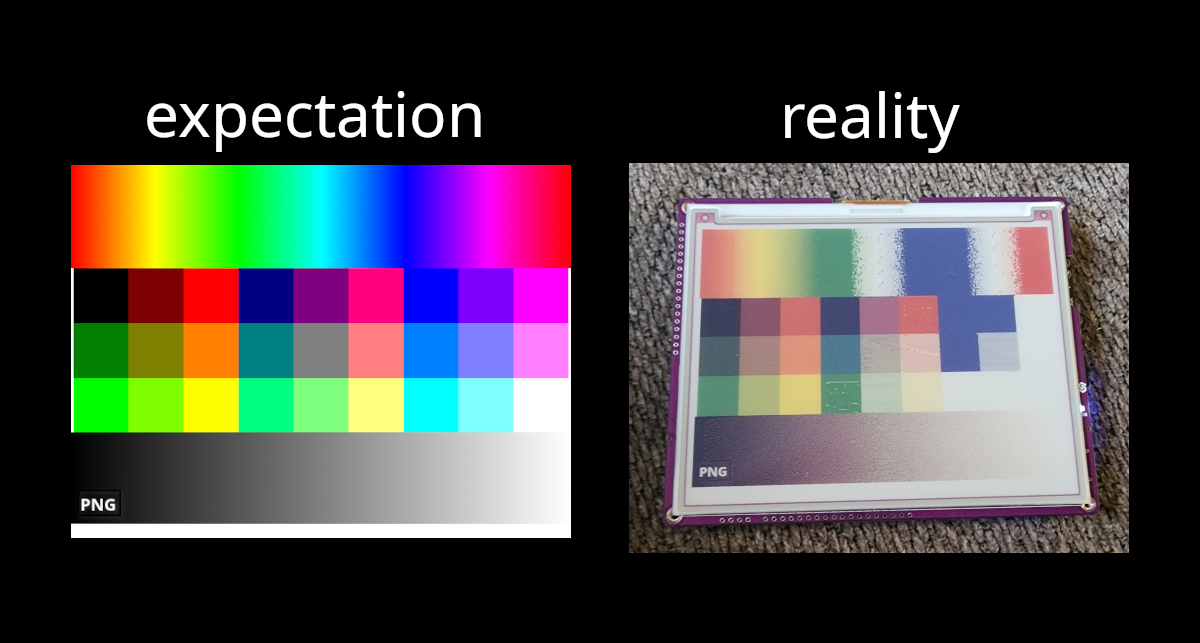
Specifically, instead of performing a gentle blend of green and blue when transitioning between them, the blending algorithm produced a heavy imbalance towards white, creating a highly inaccurate color transition. The same problem also occurred with the transition between blue and red. While these colors certainly aren't as popular in real-world photos as the actual supported colors are (heck, both yellow and orange are supported on the display), I knew that I also wanted the photo frame to support more whimsical, artificial images, such as cartoons or fantasy movie sets. So, I delved deep into the Inkplate libraries and got to work fixing the dithering.
The first thing I learned when working with the library is that its built-in dithering algorithm was based on the error diffusion principle - as the image is scanned, row by row, and the renderer is forced to approximate the actual color of the pixel by selecting a color from its limited palette, the error in the approximation is calculated, and the neighboring pixels below and/or to the right are modified to distribute that error, where the scan will encounter them and correct the error in the other direction later. The default method chosen by the library is the Floyd-Steinberg method, which applies the error according to the following kernel:
In other words, when the error for the pixel is calculated, it injects 7/16ths of it into the pixel to the right, 3/16ths of it into the pixel down and left, 5/16ths of it into the pixel below, and 1/16ths of it into the pixel down and right. These errors are applied per color channel, and are also allowed to go above the maximum of 255 or below 0, since another error correction will usually bring them right back again.
For further reading, you might enjoy this blog post about the many ways to dither an image, discussed in the context of the early-Macintosh art style used in the immersive mystery game Return of the Obra Dinn.
I first began by filing an issue on Github to document my progress on the problem. Then, I started my investigation by delving into the additional layer of complexity that color brought to the table. When dithering in black and white, choosing the color to use is easy: just pick the shade of grey that's closest to the shade of grey you're trying to draw. However, in color, there are multiple axes to choose from, meaning that you need to use some sort of nearest-neighbor algorithm across all the colors available. Here's what that algorithm looked like in the Inkplate libraries:
// defines specific to the 6COLOR board
#define E_INK_WIDTH     600
#define E_INK_HEIGHT    448
#define INKPLATE_BLACK  0b00000000
#define INKPLATE_WHITE  0b00000001
#define INKPLATE_GREEN  0b00000010
#define INKPLATE_BLUE   0b00000011
#define INKPLATE_RED    0b00000100
#define INKPLATE_YELLOW 0b00000101
#define INKPLATE_ORANGE 0b00000110

// general defines
#define RED8(a)   (((a) >> 16) & 0xff)
#define GREEN8(a) (((a) >> 8) & 0xff)
#define BLUE8(a)  (((a)) & 0xff)
#define SQR(a)             ((int32_t)(a) * (int32_t)(a))
#define COLORDISTSQR(x, y) (SQR(RED8(x) - RED8(y)) + SQR(GREEN8(x) - GREEN8(y)) + SQR(BLUE8(x) - BLUE8(y)))

static uint32_t pallete[] = {0x000000, 0xFFFFFF, 0x00FF00, 0x0000FF, 0xFF0000, 0xFFFF00, 0xFF8000};
static unsigned int width = E_INK_WIDTH, height = E_INK_HEIGHT;

uint8_t Image::findClosestPalette(uint32_t c)
{
    int mi = 0;
    for (int i = 1; i < sizeof pallete / sizeof pallete[0]; ++i)
    {
        if (COLORDISTSQR(c, pallete[i]) < COLORDISTSQR(c, pallete[mi]))
            mi = i;
    }

    return mi;
}
Pretty straightforward code - we simply find the first color with the lowest Euclidean distance to the target color.
Of course, with the 6COLOR's palette, we run into a problem with cyan and
magenta: because they have the RGB values 0x00FFFF and 0xFF00FF
respectively, they are equidistant to three different colors in the palette -
green, blue, and white; and red, blue, and white, respectively. And because
white is the first color in each of those lists, that's the color that gets
picked.
I thought, maybe, that the problem could be fixed by randomly choosing the color that gets used:
uint8_t Image::findClosestPalette(int16_t r, int16_t g, int16_t b)
{
    int64_t minDistance = 0x7fffffffffffffff;
    uint8_t contenderCount = 0;
    uint8_t contenderList[sizeof pallete / sizeof pallete[0]];

    for (int i = 0; i < sizeof pallete / sizeof pallete[0]; ++i)
    {
        int16_t pr = RED8(pallete[i]);
        int16_t pg = GREEN8(pallete[i]);
        int16_t pb = BLUE8(pallete[i]);
        int32_t currentDistance = SQR(r - pr) + SQR(g - pg) + SQR(b - pb);
        if (currentDistance < minDistance)
        {
            minDistance = currentDistance;
            contenderList[0] = i;
            contenderCount = 1;
        }
        else if (currentDistance == minDistance)
        {
            contenderList[contenderCount] = i;
            contenderCount++;
        }
    }

    return contenderList[contenderCount <= 1 ? 0 : rand() % contenderCount];
}
However, this turned out to be a poor solution, since instead of white, we now
had a bunch of unsightly blobs of color where cyan and magenta were supposed to
be. (I also knew that relying on rand() would not be a good long-term solution
anyway, since not all projects using the board can reliably seed it.)
I did some more inspection of the code, and eventually I found the root of the problem. It turned out to be centered in the error buffer that the library uses to store the various changes to the image as the dithering algorithm progresses:
int8_t ditherBuffer[3][16][E_INK_WIDTH + 20];
This stores 16 rows of pixels, with 8 bits per color channel. In the dithering algorithm itself, this buffer is modified and applied to give the "true" value of the pixel. The flaw, unfortunately, is that 8 bits per channel - the maximum error each channel can store is between -128 and 127, which is not nearly enough to cover the full range of possible error of the pixel (especially in the case of multiple color channels, where differences up to 255 are much more common than they would be with shades of grey). Changing each color channel to 16 bits provides far more room for error and fixes the problem:
// changing the number of rows to 8 so the structure still takes the same amount of memory
int16_t ditherBuffer[3][8][E_INK_WIDTH + 20];
And the results looked far better! I unfortunately neglected to take pictures of the whole deal (and also had some back-and-forth with troubleshooting additional features to further improve dithering), but after I submitted my pull request, the Soldered team was able to provide some pictures of my results, which can be viewed in the issue I filed.
With all of that done, I popped out the SD card, loaded it up with family pictures, some Astronomy Pictures of the Day, and some Star Wars Prequel memes, wrapped it up, and put it under the tree until Christmas day, where my brother opened it and thoroughly enjoyed it.
In all, working with the Inkplate was great fun! I'm not entirely sure if I can come up with a good use for one in my own home, but I might find one one day. And exploring dithering has definitely been interesting, and I intend to continue to explore dithering further in other projects that I create - both image and audio dithering would be especially relevant to projects on the Apple II, for instance.